0. 前言
上次点亮了LED灯后就迫不及待的想要点亮屏幕了。但是为了解决屏幕驱动就要了狗命,MicroPython并不自带LVGL库,如果想要在MicroPython中使用LVGL,那就需要自己搭建并构建支持LVGL库的MicroPython固件。
根据官方LVGL文档,该库已经自带了我开发板屏幕使用的ST7789驱动(更多支持看这里)。所以就着手开始自己编译一个属于自己的MicroPython固件
1. 先决条件
本文使用的设备如下:
- 开发板:ESP32-C6 + 屏幕:ST7789(这两个买回来就是一体的)
- Linux环境:Debian12
- 本文使用的是 Windows 11 + VMware Workstation Pro 17 (现已向个人用免费开放使用了)
- 点击上项链接可跳过用户注册,直接访问软件源站。可根据以下类似路径获取软件
- https://softwareupdate.vmware.com/cds/vmw-desktop/ws/版本号/构建号/windows/core/
不建议琢磨在Windows实现构建,至少之前我是这样做的。
- 安装Git
sudo apt install git
2. 搭建环境
由于“你懂的”原因,以下内容经优化后,您可在中国大陆境内网络环境流畅执行。
- 拉取ESP编译工具以及ESP-IDF
- 根据官方文档所述,支持LVGL的ESP-IDF版本为v4.0.2、v4.2.2、v4.4 或者其他版本(未经验证)
- 进入项目目录,设置临时变量
- 更新子模块(过程稍久)
- 执行环境安装
$ mkdir ~/esp32

$ git clone https://gitee.com/EspressifSystems/esp-gitee-tools.git
$ git clone -b v4.4 https://gitee.com/EspressifSystems/esp-idf.git

$ cd ~/esp32/esp-gitee-tools/
$ export EGT_PATH=$(pwd)
$ cd ~/esp32/esp-idf

$ $EGT_PATH/submodule-update.sh

$ $EGT_PATH/install.sh
执行 $EGT_PATH/submodule-update.sh 如果文件内容没有增加或减少,可以尝试使用git submodule update --init --recursive 进行更新。
执行install.sh时:
- 该过程会使用pip安装相关包。但Debian12自带的Python3.11已经设置了适用国内用户的源,如果你依然安装缓慢,你可以尝试通过该文章修改pip源
- 在Debian12中,自带的Python3.11是以Debian安装包形式安装。默认情况下不带pip,因此你可能需要执行
sudo apt install python3-pip - 使用apt安装的pip使用命令为pip3,但安装后你依然不能使用pip3 install xxx 安装相关库。官方解释为了避免破坏系统环境(卸载时不好管理?)。在install.sh执行时,可能提示需要使用virtualenv,因此你可以先执行
sudo apt install python3-virtualenv安装包后再重新执行install.sh
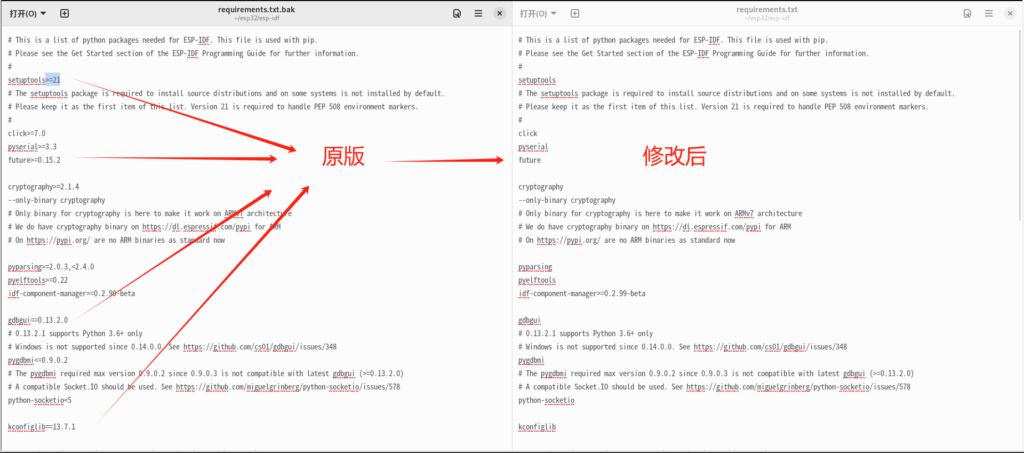
(重要!)在执行install.sh时,如果提示以下类似问题,可能是项目指定的包不支持你当前的Python版本。此时你需要手动将 ~/esp/esp-idf/requirements.txt 内指定包版本删除后再重新执行。如下图
Compiling src/gevent/resolver/cares.pyx because it changed.
      [1/1] Cythonizing src/gevent/resolver/cares.pyx
      performance hint: src/gevent/libev/corecext.pyx:1291:5: Exception check on '_syserr_cb' will always require the GIL to be acquired.
      Possible solutions:
          1. Declare '_syserr_cb' as 'noexcept' if you control the definition and you're sure you don't want the function to raise exceptions.
          2. Use an 'int' return type on '_syserr_cb' to allow an error code to be returned.
      warning: src/gevent/libev/corecext.pyx:1288:0: Global name __SYSERR_CALLBACK matched from within class scope in contradiction to to Python 'class private name' rules. This may change in a future release.
      warning: src/gevent/libev/corecext.pyx:1288:0: Global name __SYSERR_CALLBACK matched from within class scope in contradiction to to Python 'class private name' rules. This may change in a future release.
      warning: src/gevent/libev/corecext.pyx:1288:0: Global name __SYSERR_CALLBACK matched from within class scope in contradiction to to Python 'class private name' rules. This may change in a future release.
      warning: src/gevent/libev/corecext.pyx:1288:0: Global name __SYSERR_CALLBACK matched from within class scope in contradiction to to Python 'class private name' rules. This may change in a future release.
install.sh 执行成功后,按提示继续执行 . ./export.sh (注意有两个点!)
export.sh仅为当前终端设置临时环境,如果想要持久化,需要执行以下指令
# 建议先执行该指令查看相关文件夹名称,用于替换 esp-2021r2-8.4.0 这一块内容
ls $HOME/.espressif/tools/xtensa-esp32-elf
# 打开配置文件
$ vim ~/.bashrc
# 在文件末尾输入以下内容:(在Vim中可使用 Shift + Insert 粘贴)
export PATH=$PATH:$HOME/.espressif/tools/xtensa-esp32-elf/esp-2021r2-8.4.0/xtensa-esp32-elf/bin
export PATH=$PATH:$HOME/esp32/esp-idf/components/esptool_py/esptool# 使环境生效
source ~/.bashrc
# 查看编译工具版本
xtensa-esp32-elf-gcc -v完成环境配置后,再安装一个esptool包用于ESP32固件的烧录。该项你也可以选择在Windows中操作,即编译后复制到主机上进行烧录
$ sudo apt install python3-esptool至此ESP32的编译环境已经完成,下一文章讲解带LVGL库的MicroPython固件编译

发表回复