文章目录[隐藏]
1. 克隆项目
确保你的设备上安装了Git Git - Downloads
git clone --recursive https://github.com/FunAudioLLM/CosyVoice.git
cd CosyVoice
git submodule update --init --recursive2. 创建虚拟环境
尝试过直接在windows直接安装pynini,编译过程中缺少一个Linux独有的OpenFST关键依赖库。因此必须通过Conda实现安装。
安装 Conda / MiniConda: 请参阅 Download Now | Anaconda
安装后在Win开始菜单中找到 Anaconda Prompt 并打开,此时你的终端应该是 :
(base) C:\User\Administrator >
conda create -n cosyvoice python=3.10
conda activate cosyvoice
conda install -y -c conda-forge pynini==2.1.5注意在执行 conda activate cosyvoice 后,确保你的终端 (base)变成 (cosyvoice)再执行下一步安装,否则会安装在系统Python中。
3. 安装所需库
直接安装就行了,如果出现缺少了哪个库就手动安装一下。比如(Cython)
pip install -r requirements.txt -i https://mirrors.aliyun.com/pypi/simple/ --trusted-host=mirrors.aliyun.com4. 下载模型
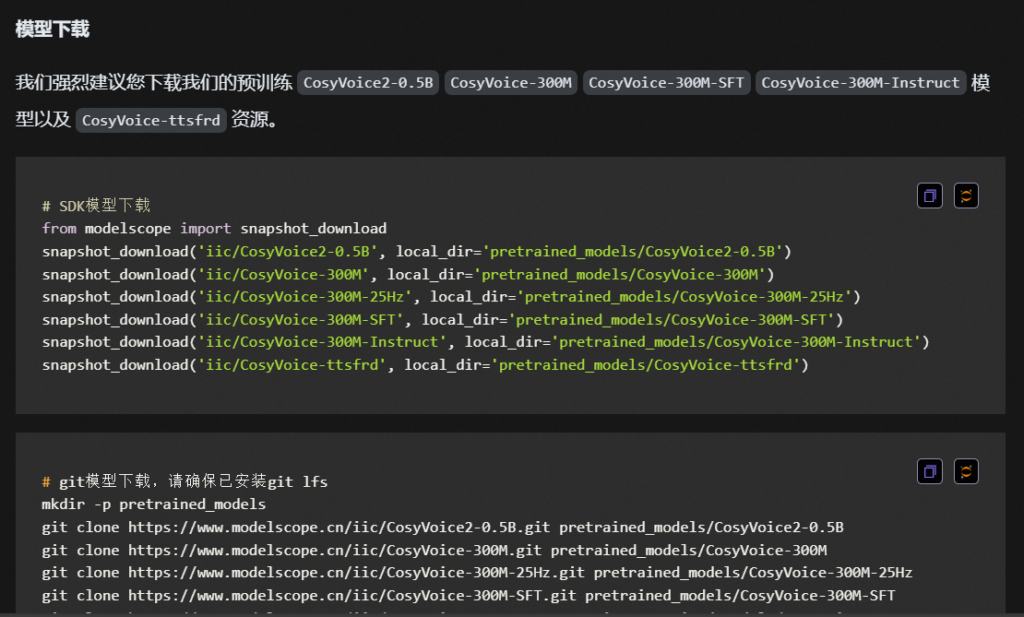
CosyVoice语音生成大模型2.0-0.5B · 模型库 官网的介绍给我写的懵懵的,如下图:

但我们只要部署 CosyVoice2 - 0.5B,只用下载第一个模型就可以了。如果你需要下载其他版本请自行操作。(直接全部复制粘贴下了快一个小时了,阿里源都给我下限速了)
注:Webui支持4种不同的推理模式:预训练音色、3s极速复刻、跨语种复刻、自然语言控制,以往的CosyVoice1要实现以上功能需要分为4个模型。现在CosyVoice2 - 0.5B一个模型就能完成四种功能!
其中,自然语言控制在WebUI中使用受限,如需体验完整功能请使用代码推理或等待官方后续更新。或者参阅新一篇文章中的解决方案:CosyVoice2实现音色保存及推理 < Ping通途说
from modelscope import snapshot_download
snapshot_download('iic/CosyVoice2-0.5B', local_dir='pretrained_models/CosyVoice2-0.5B')5. 测试
官方原文档给的是CosyVoice1.0的使用方法,我们先以启动WebUI为例。
打开webui.py的源码,可以看到默认加载的就是CosyVoice2的模型。直接运行python webui.py 即可。

5.1 可能出现的问题
如果启动时出现pydoc.ErrorDuringImport: problem in cosyvoice.flow.flow_matching - ModuleNotFoundError: No module named 'matcha'错误,请检查CosyVoice-main\third_party\Matcha-TTS 下是否有文件,在官方Git项目中这一块是使用了外链。如果没有请自行下载压缩包并解压
(250321 - 您可以直接执行 pip install matcha-tts 下载Matcha-TTS,而无需手动拉取源项目)
Matcha-TTS/configs at dd9105b34bf2be2230f4aa1e4769fb586a3c824e · shivammehta25/Matcha-TTS · GitHub
重新运行webui.py,可以看到成功进入webui界面。

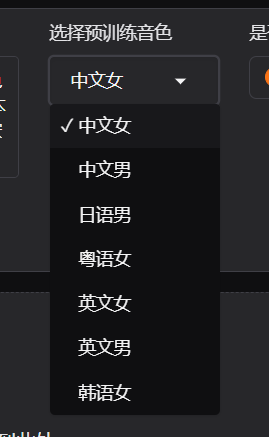
预训练音色为空的情况:
CosyVoice2-0.5B 没有 spk2info.pt ·议题 #729 ·FunAudioLLM/CosyVoice
根据上面的issus,需要手动下载spk2info.pt文件粘贴到pretrained_models/CosyVoice2-0.5B中,随后重新运行webui.py就能看到预训练模型:

以《饿殍·明末千里行》中满穗配音为基准进行各项测试,测试结果如下:
原声:
我知道,那件事之后,良爷可能觉得有些事都是老天定的,人怎么做都没用,但我觉得不是这样的。
3s急速复刻:
CosyVoice 2.0 已发布!与 1.0 版相比,新版本提供了更准确、更稳定、更快和更好的语音生成能力。
有情感的语音生成:
在他讲述那个荒诞故事的过程中,他突然[laughter]停下来,因为他自己也被逗笑了[laughter]。
方言控制:
用四川话说这句话 | 收到好友从远方寄来的生日礼物,那份意外的惊喜与深深的祝福让我心中充满了甜蜜的快乐,笑容如花儿般绽放。
5.2 合成效果不满意
一般跟提示语音、提示文本以及提示语音时长有关系,提示语音中包含叹气、换气、喘气(正常的)、杂音等噪音会被模型学习,因此需要手动将音频中噪声进行清除。可以使用Adobe Audition 或者任意一款视频编辑软件(剪映)即可处理。
原语音示例 - 安比 (采集自绝区零官网)
合成语音:
从不谈起自己的故事,仿佛没有过去,是个谜一般的少女。性格沉着冷静,战斗风格异常干练高效,像是经历过常年的训练。
可以听出语音包含换气,在剪辑软件中将换气声去除。

更正后语音示例
合成语音:
可以发现后续生成的语音没有了原始音频中的换气声,但最终合成的效果与角色本身懒惰音色有一定差别。若最终效果依然不满意,可以尝试延长样本语音时长。
6. 最小化部署(250321更新)
成功运行了环境是好事,但不可能每次都要使用webui来手动转换音频。走过所有部署流程后,我们应该都知道哪些东西是没有必要安装的。
根据官方提供的使用案例,可以通过以下代码直接进行生成。
import sys
sys.path.append('third_party/Matcha-TTS') # 使用pip安装的matcha-tts可删除此行
from cosyvoice.cli.cosyvoice import CosyVoice, CosyVoice2
from cosyvoice.utils.file_utils import load_wav
import torchaudio

cosyvoice = CosyVoice2('pretrained_models/CosyVoice2-0.5B', load_jit=False, load_trt=False, fp16=False)

# 3秒复刻
prompt_speech_16k = load_wav('zero_shot_prompt.wav', 16000)
for i, j in enumerate(cosyvoice.inference_zero_shot('收到好友从远方寄来的生日礼物,那份意外的惊喜与深深的祝福让我心中充满了甜蜜的快乐,笑容如花儿般绽放。', '希望你以后能够做的比我还好呦。', prompt_speech_16k, stream=False)):
    torchaudio.save('zero_shot_{}.wav'.format(i), j['tts_speech'], cosyvoice.sample_rate)

# 精细微调,即情感生成
for i, j in enumerate(cosyvoice.inference_cross_lingual('在他讲述那个荒诞故事的过程中,他突然[laughter]停下来,因为他自己也被逗笑了[laughter]。', prompt_speech_16k, stream=False)):
    torchaudio.save('fine_grained_control_{}.wav'.format(i), j['tts_speech'], cosyvoice.sample_rate)

# 指导生成
for i, j in enumerate(cosyvoice.inference_instruct2('收到好友从远方寄来的生日礼物,那份意外的惊喜与深深的祝福让我心中充满了甜蜜的快乐,笑容如花儿般绽放。', '用四川话说这句话', prompt_speech_16k, stream=False)):
torchaudio.save('instruct_{}.wav'.format(i), j['tts_speech'], cosyvoice.sample_rate)因此最小化部署CosyVoice2 - 0.5B,我们只需要准备以下依赖:
- main.py - 你的代码
- Matcha-TTS - CosyVoice2实现的关键模块 可使用
pip install matcha-tts直接安装 - requirements.txt - 项目所需的库
- pretrained_models/CosyVoice2-0.5B - CosyVoice2模型
- Pynini - 主要用于文本检查和语义纠错。conda install -y -c conda-forge pynini==2.1.5
附requirements.txt,仅供参考。
--extra-index-url https://download.pytorch.org/whl/cu121
--extra-index-url https://aiinfra.pkgs.visualstudio.com/PublicPackages/_packaging/onnxruntime-cuda-12/pypi/simple/ # https://github.com/microsoft/onnxruntime/issues/21684
conformer==0.3.2
diffusers==0.29.0
gdown==5.1.0
gradio==5.4.0
grpcio==1.57.0
grpcio-tools==1.57.0
hydra-core==1.3.2
HyperPyYAML==1.2.2
inflect==7.3.1
librosa==0.10.2
lightning==2.2.4
matplotlib==3.7.5
modelscope==1.15.0
networkx==3.1
omegaconf==2.3.0
onnx==1.16.0
onnxruntime==1.18.0
openai-whisper==20231117
protobuf==4.25
pydantic==2.7.0
pyworld==0.3.4
rich==13.7.1
soundfile==0.12.1
torch==2.3.1
torchaudio==2.3.1
transformers==4.40.1
WeTextProcessing==1.0.3
6.1示例
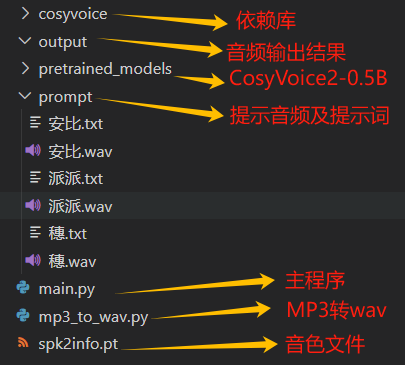
准备以下目录文件。
关于cosyvoice文件夹:尝试过pip安装,但与文章所述的cosyvoice无关(半成品)。因此您依然需要从Github拉取最新的Cosyvoice依赖库 使用。

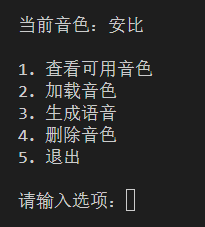
运行main.py可以看到以下几种功能,光是看选项描述您应该也能知道每个选项的功能,在此不多再介绍。

main.py 示例代码
import os
import time

import torch
import torchaudio
from cosyvoice.cli.cosyvoice import CosyVoice2
from cosyvoice.utils.file_utils import load_wav
from tqdm import tqdm

# 初始化CosyVoice2模型,指定预训练模型路径,不加载jit和trt模型,使用fp32
cosyvoice = CosyVoice2('pretrained_models/CosyVoice2-0.5B',
                       load_jit=True, load_trt=False, fp16=True)

# 设置最大音量
max_val = 1.0
# 设置说话人信息文件的路径
spk2info_path = f'spk2info.pt'


# 如果说话人信息文件存在,则加载
if os.path.exists(spk2info_path):
    spk2info = torch.load(
        spk2info_path, map_location=cosyvoice.frontend.device)
else:
    spk2info = {}


def load_speaker_info(speaker, retrain=False):
    load_start = time.time()
    if retrain:
        if speaker in spk2info:
            del spk2info[speaker]
    if speaker not in spk2info:
        prompt_speech_16k = load_wav(f'prompt/{speaker}.wav', 16000)
        print(f'Extracting speaker info for {speaker}...')
        train_start = time.time()
        # 获取音色embedding
        embedding = cosyvoice.frontend._extract_spk_embedding(
            prompt_speech_16k)
        # 获取语音特征
        prompt_speech_resample = torchaudio.transforms.Resample(
            orig_freq=16000, new_freq=cosyvoice.sample_rate)(prompt_speech_16k)
        speech_feat, speech_feat_len = cosyvoice.frontend._extract_speech_feat(
            prompt_speech_resample)
        # 获取语音token
        speech_token, speech_token_len = cosyvoice.frontend._extract_speech_token(
            prompt_speech_16k)
        # 将音色embedding、语音特征和语音token保存到字典中
        spk2info[speaker] = {'embedding': embedding,
                             'speech_feat': speech_feat, 'speech_token': speech_token}
        # 保存音色embedding
        torch.save(spk2info, spk2info_path)
        print(
            f'Extracting speaker info for {speaker} done!', 'Time:', time.time()-train_start)
    print('Load time:', time.time()-load_start)


# 定义一个文本到语音的函数,参数包括文本内容、是否流式处理、语速和是否使用文本前端处理
def tts_sft(tts_text: str, prompt_text: str, speaker_info: dict, stream=False, speed=1.0, text_frontend=True):
    '''
    参数:
        tts_text:要合成的文本
        prompt_text: 提示文本
        speaker:说话人音频特征
        stream:是否流式处理
        speed:语速
        text_frontend:是否使用文本前端处理

    返回值:
        合成后的音频
    '''

    # 使用tqdm库来显示进度条,对文本进行标准化处理并分割
    for i in tqdm(cosyvoice.frontend.text_normalize(tts_text, split=True, text_frontend=text_frontend)):
        # 提取文本的token和长度
        tts_text_token, tts_text_token_len = cosyvoice.frontend._extract_text_token(
            i)
        # 提取提示文本的token和长度
        prompt_text_token, prompt_text_token_len = cosyvoice.frontend._extract_text_token(
            prompt_text)
        # 获取说话人的语音token长度,并转换为torch张量,移动到指定设备
        speech_token_len = torch.tensor(
            [speaker_info['speech_token'].shape[1]], dtype=torch.int32).to(cosyvoice.frontend.device)
        # 获取说话人的语音特征长度,并转换为torch张量,移动到指定设备
        speech_feat_len = torch.tensor(
            [speaker_info['speech_feat'].shape[1]], dtype=torch.int32).to(cosyvoice.frontend.device)
        # 构建模型输入字典,包括文本、文本长度、提示文本、提示文本长度、LLM提示语音token、LLM提示语音token长度、流提示语音token、流提示语音token长度、提示语音特征、提示语音特征长度、LLM嵌入和流嵌入
        model_input = {'text': tts_text_token, 'text_len': tts_text_token_len,
                       'prompt_text': prompt_text_token, 'prompt_text_len': prompt_text_token_len,
                       'llm_prompt_speech_token': speaker_info['speech_token'], 'llm_prompt_speech_token_len': speech_token_len,
                       'flow_prompt_speech_token': speaker_info['speech_token'], 'flow_prompt_speech_token_len': speech_token_len,
                       'prompt_speech_feat': speaker_info['speech_feat'], 'prompt_speech_feat_len': speech_feat_len,
                       'llm_embedding': speaker_info['embedding'], 'flow_embedding': speaker_info['embedding']}
        # 使用模型进行文本到语音的转换,并迭代输出结果
        for model_output in cosyvoice.model.tts(**model_input, stream=stream, speed=speed):
            yield model_output


def synthesis(tts_text: str, speaker: str):  # 生成语音
    # 获取说话人信息
    prompt_text = open(f'prompt/{speaker}.txt', 'r', encoding='utf-8').read()
    # 遍历每个文本的生成结果
    for i, j in enumerate(tts_sft(tts_text, prompt_text, speaker_info=spk2info[speaker], stream=False, speed=1.0, text_frontend=True)):
        # 保存生成的语音到文件,文件名包含文本的前四个字符
        torchaudio.save(f"output/{speaker}_{tts_text[0:4]}_{time.strftime('%Y%m%d%H%M%S', time.localtime())}.wav", j['tts_speech'], cosyvoice.sample_rate)
    print("生成完成!")


speaker = ""

while True:
    os.system("cls")
    spk2info_list = ",".join(list(spk2info.keys()))
    print(f"当前音色:{speaker}") if speaker else print("当前未选择音色")
    print("""
1. 查看可用音色
2. 加载音色
3. 生成语音
4. 删除音色
5. 退出
""")
    try:
        choice = int(input("请输入选项:"))
        if choice == 1:  # 查看可用音色
            if spk2info_list:
                print("可用音色:", spk2info_list)
                time.sleep(3)
            else:
                print("当前没有可用的音色")
                time.sleep(2)
            continue

        elif choice == 2:  # 加载音色
            os.system("cls")
            speaker_name = input("请输入要加载的音色名称:")
            if speaker_name not in spk2info.keys():
                retrain = input("音色不存在,是否训练?[Y/N]")
                if "y" in retrain or "Y" in retrain:
                    load_speaker_info(speaker_name)
                    speaker = speaker_name
                elif "n" in retrain or "N" in retrain:
                    continue
                else:
                    print("输入错误,请重新输入")
                    time.sleep(1)
                    continue
            else:
                speaker = speaker_name
                print("音色加载成功!")
                time.sleep(1)

        elif choice == 3:  # 生成语音
            if not speaker:
                print("请先选择音色")
                time.sleep(1)
                continue
            os.system("cls")
            print("当前音色:", speaker)
            text = input("请输入要合成的文本:")
            synthesis(text, speaker)

        elif choice == 4:  # 删除音色
            os.system("cls")
            delete_speaker = input("请输入要删除的音色名称:")
            if delete_speaker not in spk2info.keys():
                print("音色不存在")
                time.sleep(1)
                continue
            else:
                spk2info.pop(delete_speaker)
                torch.save(spk2info, "spk2info.pt")
                print("音色删除成功!")
                time.sleep(1)

        elif choice == 5:
            break
        else:
            print("输入错误,请重新输入")
            time.sleep(1)
    except Exception as e:
        print("输入错误,请重新输入")
        print(e)
        time.sleep(1)
print("程序即将结束..")
mp3_to_wav.py 示例代码
from pydub import AudioSegment
import os

# 扫描指定目录下的所有mp3文件
convert_list = []
for root, dirs, files in os.walk("prompt"):
    for file in files:
        if file.endswith(".mp3"):
            convert_list.append(os.path.join(root, file))

# 是否删除源文件?
delete_mp3 = True

mp3_file:str
for mp3_file in convert_list:
    sound = AudioSegment.from_mp3(mp3_file)
    sound.export(mp3_file.lower().replace(".mp3", ".wav"),format="wav")
    if delete_mp3:
        os.remove(mp3_file)
print("转换完成")

发表回复